Best New year apps & tricks

    Hi this is Prophet , First of all ,all my readers Happy New Year 

    This post is dedicated to New Year 

    1. New year Resolution's App

    In those days many of you set a new year resoltion ,but you don;t kept your promises.


    Top Tips to Keep Your New Year's Resolutions

    Whether you plan to finally kick the habit, embrace a healthier lifestyle or pay down that debt, New Year's resolutions are simple to make but often difficult to keep. While many have the best of intentions, it's time to plan your winning strategy now.
    • In order to keep those resolutions, make them attainable and specific. Many are too general. How many pounds do you want to lose? One or 50?
    • Give yourself a specific time-frame. How many pounds do you want to lose in a week or a month?
    • Be flexible.
    • Keep a record of your journey.
    • If someone you know has the same goal, why not tackle it together? The buddy system helps keep you motivated.
    • Reward yourself from time-to-time. You deserve it!

    10 Best Apps to Keep Resolutions

    Just in case you need a little help, take a peek at a few handy-dandy apps to keep you on track.
    • Fooducate - If you want to eat healthier, this free app for iOS and Adroids is a must-have! Simply scan the barcode on your grocery products and find out what nutritional grade the product receives.
    • Lose It! - If you want to get in shape this year, Lose It! is a must-have! This free app is for Android and iOS.
    • Nutrino - This free app will build a personalized menu for you tailored specifically for your needs.
    • Human - This free app for iOS helps keep you moving and uses location tracking to measure your activity.
    • Buy Me a Pie - Never forget anything at the grocery store again with this handy app. Save time and money by managing and synchronizing that grocery list with other family members. Available for iPad, iPhone, Android devices, this app is not free- it's $2.99.
    • Cessation Nation - If kicking the habit is your goal for the New Year, Cessation Nation is the app for you!
    • Quit Now! - This free tool will keep track of how much money you've saved, how long it's been since your last cigarette and help you cope with anxiety.
    • Mint Personal Finance - This free app, for Androids, iOS and Windows Phone, helps keep track of your budget and saving goals.
    • BillGuard - This free app includes colorful graphs and charts to help you lower your monthly expenses.
    • Take a Break - Need to unwind a little? Check out this free app for iOS and Androids and relax with 7 or 13-minute meditation sessions.

     2.Wallpaper or Live Wallpaper


     For this wallpaper app go to this link HD live Wallpaper

     For this cool live wallpaper go to Google Play


     3. Free sms  App


    Description

    Fullonsms.com brings its service to the android users.
    Send unlimited, FULL 160 characters SMS for FREE to people in India. Stay in touch with your friends & family without the worries of mobile bills.
    • - Schedule SMS for future delivery
      • - Create multiple groups
      • - Import contacts from your phone-
      • - Start typing name OR mobile number & much more!

     Download Link


    4. Special Design Message 

    On FB you make some special design message at this site ZALGO

    H̸̦̲̮͎͔̺̃̾ͨͯ͗͢ͅa̶̧̠̼̽ͥ̐ͯ̃͘p͙̘̝̽̐̇̎ͤͬ͟p̡̮̖͍͈̠̄͟͞ȳ͉̻͉̌͒͒ ̴̵̝̭̯͕͒̓̂̽͊̾̈́Ň̤̙̼̫̟̤͚̞ͫ̇͢è̤̮̤̯̪͉̠̒̈̀͢w̱̜̗̗̱͔̋̏̐͛̑̚͞ ̖̘̦͔̥̫̈́͐͢Y̸̵̬͕̘̖̼͖͂͐ͅȇ̷̪̘̏a̘̮̝͉͕̫̳̳̝̋̇ͩ̏ͨͧ̒̀r̛̰̣ͭ̉


     For more details go::: Zalgo Text generator

    5. Free Calling   

    You can cangrutulate your friend by free calling .
    you can go to this site

    Call2friends

    without registration simply write down your friend number and make a call only for 45 seconds 

    ##Happy New Year

      Source URL: https://ampledreams.blogspot.com/2013/12/
      Visit ampledreams for Daily Updated Cars Collection

    30 Christmas and New Year Best HD Wallpapers { SET- 7 }

      image 30 JPG | Mix Res  | 40 mb


      download

      Source URL: https://ampledreams.blogspot.com/2013/12/
      Visit ampledreams for Daily Updated Cars Collection

    30 Christmas and New Year Best HD Wallpapers { SET- 6 }

      image 30 JPG | Mix Res  | 16 mb


      download

      Source URL: https://ampledreams.blogspot.com/2013/12/
      Visit ampledreams for Daily Updated Cars Collection

    20 Christmas Girls Super HD Wallpapers { SET- 8 }

      image 20 JPG | Mix Res  | 20 mb


      download

      Source URL: https://ampledreams.blogspot.com/2013/12/
      Visit ampledreams for Daily Updated Cars Collection

    Genymotion: Fast, Easy To Use Android (x86) Emulator With OpenGL Hardware Acceleration Support

      Genymotion is a fast Android emulator which comes with pre-configured Android (x86 with OpenGL hardware acceleration) images, great for application testing. The project has evolved from the old AndroidVM and compared to it, Genymotion comes with a new player design, installer and more.


      According to its developers, "the product is aimed at replacing the Android Emulator from Google not only for Android developers but also for people making Android apps demonstrations".

      Genymotion (currently in beta) is available for Linux, Windows and Mac OS X and requires VirtualBox. The virtual images code is open source (available HERE) however, the software that runs on the host (the "player") is not, but it is free to use. In the future, Genymotion will continue to have a free to use version with many advanced features but there will also be paid versions, "mainly for large companies needing collaboration on Genymotion".

      Genymotion features:
      • Easily download and run pre-configured virtual images: Android 4.1.1, 4.2.2 and 4.3 (with x86 support): Nexus 7, Nexus S, Nexus One, Galaxy Nexus, Galay S4, HTC One, Xperia Z, WXGA 10.1'' Tablet and WSVGA 7.0'' Tablet;
      • Networking: Ethernet (emulates WiFi connection);
      • GPS (with configurable coordinates) and battery (with configurable battery levels) emulation widgets;
      • Display: OpenGL hardware acceleration, multiscreen, full screen display;
      • Genymotion shell which allows you to interact with your VM using a command line;
      • ADB support;
      • Eclipse and Android Studio plugins;
      • Supports Linux, Windows and Mac.

      More sensors are expected in future releases: gyroscope, light, temperature, rotation vector and so on.

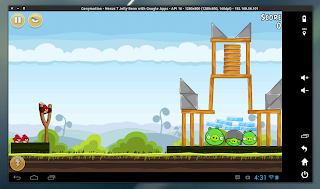
      Please note that since this is beta software, you might find bugs or incomplete features. In my test, things have worked pretty well: the Internet connection has worked out of the box and I was able to play games like Angry Birds or Fruit Ninja without any lag (but this obviously depends on your hardware):

      Genymotion Android x86


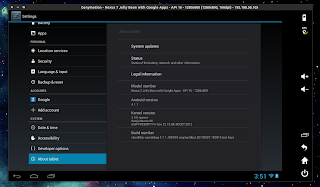
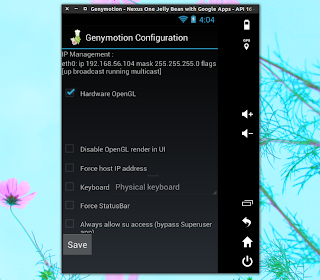
      Here are a few more screenshots:

      Genymotion Android x86

      Genymotion Android x86

      Genymotion Android x86

      Genymotion Android x86
      Networking
      • Wi-Fi
      • 3G
      • Bluetooth
      • GPS
      Display
      • Open GL acceleration
      • Multiscreen
      • Full screen display
      More sensors to come
      • Battery
      • Gyroscope
      • Light
      • Temperature
      • Rotation Vector
      YOU NEED

      • VirtualBox
      • Genymotion app (Windows, Linux or MAC version)
       

      STEP 1 Go to Genymotion, register and download appropriate version. If you are using Windows 32/64 bit you can download ready-to-run Genymotion installer for Windows. This version includes Oracle VirtualBox 4.2.12 dependency, so that you don’t need to download and install VirtualBox manually. 
      I am using Linux 64 bit version on Ubuntu 13.04, and the installation is a little different for me then it is for Windows users.
      Windows users can just run genymotion-1.0-vbox.exe after they download it and continue with step 3.

      STEP 2
      Place genymotion-1.0_x64.bin in your home folder and open terminal window then just type following commands.
      • chmod +x ./genymotion-1.0_x64.bin
      • ./genymotion-1.0_x64.bin
      After the second command it’s going to ask you: Installing to folder /home/name/genymotion. Are you sure [y/n] ?
      Just press Y and Enter
      Installation done successfully.
      You can now use these tools from /home/name/genymotion:
      - genymotion
      - genymotion-shell
      STEP 3
      • This is the part where we setup the app for the first time. 
      Genymotion1

      • The application will ask you your Genymotion credentials that you used to download the app from Genymotion cloud
      Genymotion2

      • You can choose from multiple devices like Nexus 7 and HTC Nexus One, and even Galaxy devices. Select your device and download will start. 

      Genymotion3

      • Information about device you select will be displayed like this. Just follow on screen instructions.
      Genymotion4

      • At the end just press Finish and you are ready to run your virtual Android device with Genymotion. 
      Genymotion5

      • This is how the app screen looks like after you download and setup your device. To start your device you just need to press Play button.
      Genymotion6

      • Nexus 7 with Google apps running on Ubuntu 13.04 in virtual environment. For the first time when device is started you need to set it up just like any other Android device, and after that play with it. 
      Genymotion7

      Genymotion8

      This is a great way for developers to test apps and for users to play with Android. Be sure to tell us what you think about virtual Andorid on PC in the comments below.
      ADB
      ADB can be used for various purposes like copying a file to VM, installing apps, debugging, etc.
      For more info check this out.
      Source URL: https://ampledreams.blogspot.com/2013/12/
      Visit ampledreams for Daily Updated Cars Collection

    Install BackTrack on Android Mobile

      What is BackTrack 5

      Backtrack is a very popular linux distribution for penetration testing. It has hundreds of tools for pentesting and hacking. BackTrack provides users with easy access to a comprehensive and large collection of security-related tools ranging from port scanners to Security Audit.

      BackTrack includes many well known security tools including:
      - Metasploit for integration
      - RFMON, injection capable wireless drivers
      - Aircrack-ng
      - Gerix Wifi Cracker
      - Kismet
      - Nmap
      - Ophcrack
      - Ettercap
      - Wireshark (formerly known as Ethereal)
      - BeEF (Browser Exploitation Framework)
      - Hydra
      - OWASP Mantra Security Framework, a collection of hacking tools, add-ons and scripts based on Firefox
      - Cisco OCS Mass Scanner, a very reliable and fast scanner for Cisco routers with telnet and enabling of a default password.
      - A large collection of exploits as well as more commonplace software such as browsers.

      BackTrack arranges tools into 12 categories:
      - Information gathering
      - Vulnerability assessment
      - Exploitation tools
      - Privilege escalation
      - Maintaining access
      - Reverse engineering
      - RFID tools
      - Stress testing
      - Forensics
      - Reporting tools
      - Services
      - Miscellaneous

      What you will need

      - Backtrack 5 ARM
      - Free space on the root of you device for backtrack 5
      - A rooted device
       How to root Android Device
      - Busybox
      - SuperUser
      - Terminal Emulator
      - AndroidVNC
       First thing all of these are free on Google play

      First you download  compressed Backtrek arm image for android Backtrack-;armv.10 Download
      The Second thing is install Zararchiever for extract compressed backtrek image file Zararchiever Download

      OK are you ready to install backtrek on android ,Now you install Busybox ,BusyBox is installer and uninstaller Android program Busybox Download

      Now you install Linux Installer ,linux installer is a main application in this process Linux Installer Download
      Open Linux Installer and click on Launch button,on your right side
       click on Setting > Edit then change the file path there to your backtrack image, the .img file that you extracted.
      Now you need a Terminal Emulator 
      Terminal Emulator will open, you just have to proceed with the installation steps, ask you for a new password, and some preferences. When it's done you will get a red "root@localhost~#" like the picture bellow:

      You are now in backtrack! Now if you want backtrack in GUI , go to Google Play and install Android VNC
      Open It when it finishes installing, and it will look like this
      Now lets run Backtrack GUI with VNC viewer
      startvnc
       To connect wth VNC we must know the port where VNC listening. Run netstat -anpt and remember the port where VNC listening. In this case the port is 5901
      Open AndroidVNC and fill the form like this:
      Nickname : BT5
      Password : toortoor
      Address : 127.0.0.1
      Port : 5901
      Connect it and you will see Backtrack 5 interface :-)

      You Download  & install more linux distribution by these same trick .
      All Android  Linux Distribution Download Link


      Source URL: https://ampledreams.blogspot.com/2013/12/
      Visit ampledreams for Daily Updated Cars Collection

    Download XBMC for Window and Android

      XBMC is a free and open source media player developed by the XBMC Foundation, a non-profit technology consortium. XBMC is available for multiple operating-systems and hardware platforms, with a 10-foot user interface for use with televisions and remote controls. It allows users to play and view most videos, music, such as podcasts from the internet, and all common digital media files from local and network storage media
      XBMC is the ultimate media center software, because it gives you a single interface for accessing all of your media from all of these different places. Even better: it does so using a remote-friendly interface, so with a few taps of your remote you can browse your digital collection of music and videos, explore some of the most popular media sites on the web or check out live Internet TV from around the world. Set up properly, XBMC can do just about anything you’d want your TV to be able to do online – from Hulu to your movie collection, from YouTube to live sports you’ve bought an online subscription
      XBMC Features

      Music

      Video 

      Pictures

      Movies

      Addons

      Web Interfaces

      Remote Control 

      Upnp

      TV Shows

      When you install xbmc in your device you get some find more really fantastic skin from XBMC Skin  ..mine best is AEON NOX


      Source URL: https://ampledreams.blogspot.com/2013/12/
      Visit ampledreams for Daily Updated Cars Collection

    How To Transfer Balance From Aircel,Airtel,Idea,Bsnl,Vodafone,Docomo


      Hi friends,now i'm giving a trick to how to transfer you balance from your phone to another phone.Try this trick and transfer balance for all operators 

      1. Vodafone Balance Transfer Trick

      Go through the following steps:
      Step1: Dial *131*Amount*friend vodafone mobile no# [eg: *131*50*9052XXXXXX#]
      Terms and conditions: Charges Rs.1/- for balance transfer

      2. Airtel Balance Transfer Trick

      Follow the Steps below:
      Step1: Dial *141# and follow the instructin
      OR
      Step2: *141*1*Amount*Mobile Number# [eg: *141*1*5*9910XXXXXX#]

      3. BSNL Prepaid Balance Transfer Trick

      Follow the steps below:
      Step1: SMS ” GIFT friend Bsnl number amount ” to 53733 or 53738
      [eg: GIFT 949XXXXXXX 50 ]
      Terms and Conditions apply.

      4. Idea Balance Transfer Trick

      Follow the below Steps:
      Step1: Dial *567*friend mobile number*amount#
      [eg:*567 *9092 XXXXXX*50#] Finish.
      Term and Conditions: You Will Be Charged Rs/- 2 For this Method.

      5. Tata Docomo Balance Transfer Trick

      Follow the steps below:
      Step: SMS “BT Mobile Number Amount” and send it to 54321[eg: BT 72078XXXXX 50]

      6. Uninor Balance Transfer Trick

      Follow the below steps:
      Step1: Choose the amount to transfer.
      Step2: Dial *202*friend mobile number*amount#
      [eg: *202*962XXXXXXX*50#] Finish your amount has been transferred.

      7.Aircel Balance Transfer Trick


      Follow the below steps:
      aircel users can transfer balance upto rs 100 

      transfer code

      *122*666#

      Terms and Conditions: Minimum balance should be rs.5/-
      Important Note:
      1. Balance Transfer Code work between same networks  like Vodafone to Vodafone,  Airtel to Airtel etc.
      2. Terms and conditions apply for balance transfer.
      Source URL: https://ampledreams.blogspot.com/2013/12/
      Visit ampledreams for Daily Updated Cars Collection

    How to Combine Your Facebook Cover Photo With Your Profile Picture

      Cover photo is one of the silent features of timeline profile in Facebook. Your Facebook cover photo along with your profile picture is one way of providing uniqueness and beautiful look to your profile.

      You must always try to make your profile look good to attract more users. Now you need to not worry about this because today i will tell you an awesome trick to combine your Facebook cover photo with your profile picture to enhance the look of your profile.
      Here is a sample picture of what i am talking about

      How to Combine Your Facebook Cover Photo With Your Profile Picture?


      The process of merging your cover and profile photo is very simple. For this follow the instructions given below -

      1. First of all open this website - www.trickedouttimeline.com

      2. Now scroll down a bit below and select “Merge Profile and Cover Photo”. There are many other effects available there too, you may check them as well

      3. Now select a photo to use. You have two options over here. The first one is uploading a new picture from your hard disk and the second one is using your current Facebook cover photo.

      4. Select the area that you want to make as cover picture and that website will make profile picture accordingly. See the screenshot below. Click “Done” after the selection.

      5. After you are done simply like their Facebook Fan page and download your profile photo and cover photo separately.

      6. Now you simply need to upload these profile and cover photo to your Facebook profile.

      Some really cool effects are below ..


      Source URL: https://ampledreams.blogspot.com/2013/12/
      Visit ampledreams for Daily Updated Cars Collection
    How to Check 2G/3G Internet Balance in Mobile and Netsetter

                                                                                                                                                                                     To check The remaining internet data balance.type the following codes in your mobile


                Network Provider
                                        USSD Command Codes/SMS
                                     2G
                                     3G
      Idea
                        *125#
                            *125#
      Airtel
      *123*10# *123*11#
      *123*10# or *123*11#
      BSNL
      North East Circle:*123*10#
      Maharastra,Goa Circle:*112#
      AndraPradesh Circle:*234#
      UtterPradesh:*123*6#
      Kerala:*124*1#
      Tamilnadu:DATA2G to*53733#
      North East Circle:*123*10#
      Maharastra,Goa Circle:*112#
      AndraPradesh Circle:*234#
      UtterPradesh:*123*6#
      Kerala:*124*1#
      Tamilnadu:DATA3G to *53733#
      Vodafone
      DATA BAL to 144
      *111# then select option 6
      DATA BAL to 144
      *111# then select option 6
      Aircel
      *111*10# or *111*9#
      *111*10# or *111*9#
      Tata Docomo
      *111*1# or *191# or *111#
      *111*1# or *191# or *111# 
      Reliance
      BBAL ur mobile no to 53535
      BBAL ur mobile no to 53535
      Videocon
      *123#
      *123#
      Source URL: https://ampledreams.blogspot.com/2013/12/
      Visit ampledreams for Daily Updated Cars Collection

    Check Your Own Mobile Number- in All Network Provider

                               Nowadays its become common thing to have more than one sim’s , there is no surprise we do have atleast two sim in use . Incase you are in a situation where you don’t remember or saved the number in your contact , there is no balance too ?
                                                                                                                                                                               Then you may have to look for , How to find my own mobile number ? Don’t worry about that , Here we’ve shared the trick / tips to Find Own number of major Indian mobile operators .

      Network Provider Dial Code
      Idea *789# or *100# or *1# *147# *131# or *131*1#
      Vodafone *555# or *555*0# or *111*2# or *777*0# or *131*0#
      Airtel *140*175 or*140*1600# or *121*9# or *282#  *141*123#
      Aircel *1# or *234*4# or *888# or *122*131# or *131#
      Reliance *1# *111#
      Bsnl*1# or *99#
      Videocon*1# 
      Virgin*1# 
      Tata Docomo*1#  or *580# or *124#
      Uninor*444# *555# *1#
      BPL or Loop*222# *1# *001#
      MTNL*8888#
      Smart*1# *111*2#
      VirginSMS:  NUM to 51230 or *1#
      Source URL: https://ampledreams.blogspot.com/2013/12/
      Visit ampledreams for Daily Updated Cars Collection

    Installing Compiz & Emerald in Linux for 3D Effects

      Here, I'll tell you as requested by some visitors that how can you make boring Linux distributions much eye-candy. Don't you worry this isn't going to make your system much slower as compared to those third party softwares which may be used under windows .are you ready to decorate your linux party.                                                     

                                                                                                                                                                      Installing Compiz and Emerald in Linux to Enable all 3D Effects specially Backtrack 5 r1


      What we need is this that just open up the terminal and write down the following commands:-
          If you are logged in as root then use following commands:-

          apt-get install compiz compiz-fusion-plugins-extra emerald simple-ccsm fusion-icon

          If logged in under ubuntu,fedora,opensuse etc. not as a root then use:-

          sudo apt-get install compiz compiz-fusion-plugins-extra emerald simple-ccsm fusion-icon

      If you want compiz-fusion-plugins-unsupported to be installed and on including this command in above written long command, gives an error during the terminal installation, then kindly download compiz-fusion-plugins-unsupported from here (Third Party Download Site Link). It will be located here in Download. So, to make it install open up terminal and write down the following commands one by one:-
          1. cd /root/Downloads

          2. dpkg -i compiz-fusion-plugins-unsupported.deb
          Note:- {to read what these plugins do read wiki.compiz.org.Also you need a working internet connection}

      After compiz and emerald installation what to do next!


      Just go to System>Preferences>Appearence>Visual Effects (Tab) and then select custom or else ultimate graphics. Woa! Your linux is just tuned up now. Now next step is to go to System>Preferences>Simple Compiz Cofig. Setting Manager and then select those animation which you want to load. And tuneup every bits of your very own Linux with many animations and effects present in compiz.

                                                          Emerald


      Launch the Emerald theme Manager from the same preferences located under system in the main panel. And then select which theme you want to choose. You will notice that on loading your default theme has already changed. Now, next step is to download more emerald themes and to import them in Emerald.

      Some Troubleshooting:-


      If you are using Intel graphics chipset then there are chances that you may have crashes on your system concerned with X0rg. To avoid this keep your drivers up to date. Plus! theres a little trick to avoid this. Load the Compiz Fusion Icon from the start panel. It may be in System Tools under Applications or else find it your self. Here a run key for that also which you may like to add at startup fusion-icon --no-start. Now once it loads then right click on its icon placed at the upper panel's corner and then select Reload Windows Manager. Screen may flicker and every thing will work fine. This trick will work specially if you get following errors:-

      bo map failed to access (In x0rg.log)
      You find more themes at here
      Source URL: https://ampledreams.blogspot.com/2013/12/
      Visit ampledreams for Daily Updated Cars Collection
    Remove Write Protection On USB Pen Drive or Memory Card

      Write Protection on any portable USB Device can be applied by the physical lock provided on the card adjuster or some times provided on the pen drives, so make sure to make your drive not write protected by moving the lock in right direction.
      But even after moving the physical lock for write protection the problem can happen due to some virus action. This happens when some virus or script which applies the registry hack to make any drive write protect when connected to the computer, In that case follow the procedure below to remove write protection from your pen drive.

      First Method

      1. Open Start Menu >> Run, type regedit and press Enter, this will open the registry editor.
      2. Navigate to the following path:
      HKEY_LOCAL_MACHINE\SYSTEM\CurrentControlSet\Control\StorageDevicePolicies

      Note: If the registry key StorageDevicePolicies key does not exist, you will need to create it
      Download this batch file called add.bat from here, and double click after download the key will be automatically added to registry.
      3. Double click the key WriteProtect in the right pane and set the value to 0 in the Value Data Box and press OK button
      4. Exit Registry, restart your computer and then again re-connect your USB pen drive on your computer. That is it, done.
      In case you still find an issue, please leave a comment below.

       Second Method

       Second method which you can follow to solve the “Pen Drive is Write Protected” problem.
      If the above method does not work for you, follow the below steps:
      1. Copy all the important data from this drive to your computer because this method will format the drive and erase all the data on the pen drive.
      2. Now download the Apacer Formatting Utility, Unzip this utility to a folder on your hard disk, preferably on a folder on desktop screen for easy access (Do Not Try To Save it on pen drive). Keep your pen drive plugged in, and double click on the Start.bat file in the folder where you unzipped the above utility. This will start formatting your pen drive, wait till the formatting completes and the LED on your pen drive stops blinking. Remove your pen drive after than and plug it in again.
      The above two steps will solve the problem. If you still face the problem, follow the below steps:
      1. Goto Start > Run, type cmd and press enter, this will open command prompt.
      2. Type the following command on the command prompt replacing X with the drive letter of your pen drive.
      CHKDSK X: /F
      The above two methods will help you fix the problem.
      Source URL: https://ampledreams.blogspot.com/2013/12/
      Visit ampledreams for Daily Updated Cars Collection
    Make VLC run in Backtrack 5 - Fix for running VLC Under root

      Was playing with some weird things under backtrack and when installed a good player named as VLC for playing some songs formatted as .flv , I got amused that it wasn't running and nothing happened also not a single error. Just a peaceful screen on clicking the VLC player under the application menu. Some entertainment was necessary so this made me feel angry that's why I started to search out for a fix to made it run. Then I came up to terminal and tried to run that without graphical interface and came with an error which had a theme like this:-

          "Unable to run VLC under the root, Try other way to run as unprivileged user."

      Thus, I thought to tried to sort this problem. Lets go with step by step process. Don't panic there is not much tedious process to follow. As most of the common users find linux to be weird than Windows.
      How to Install VLC under Linux:-

      Go to terminal and type this command:-

      sudo apt-get install vlc

      If it asks for password then write and press enter. Under the same terminal it will start installing vlc media player. (You need to be connected to internet. If not then download the vlc media player and place that in that pc where there is no internet) when you type the password there will be no characters shown so don't worry just write and hit enter.
      Fix to make vlc run under Bactrack - Making VLC run under the root:-

          Open the terminal.
          Write this command and hit enter

              hexedit /usr/bin/vlc

          Press tab and you will see that blinker has been shifted to the 2nd group.
          Find this geteuid._libc_start_man by scrolling the mouse wheel or else pushing the down button; and replace with this getppid.libc_start_man(i-e you just have to change the word take the pointer there and then just write; and you will see that alphabets different from the already there will start getting replaced by newly typed)
          After done press ctrl+s and type y (means yes). You are done.

          In the same terminal type vlc and hit enter. Woa! It runs now. Tune the speakers and let rocks
      Source URL: https://ampledreams.blogspot.com/2013/12/
      Visit ampledreams for Daily Updated Cars Collection

    My Blog List

    Popular Posts

    Blog Archive